There are several ways to photograph cavity nesting birds. You can use a regular camera, a birdcam or a nestcam. A birdcam is fixed, and automatically snaps a shot when the motion detector is tripped. It is usually placed near a feeder or nestbox. You can get some really nifty shots without trying very hard. See more information on options and set up. A nestbox camera, or nestcam is a tiny infrared camera placed inside a nestbox to capture activity that most people never get to see. See information on options and set up.
Capturing birds in the lens of a regular camera is a bit more challenging. It is easier to photograph birds that frequent feeders or adults that are tending to their young in a nestbox. Here are some tips to avoid a blurry shot of a speck of color lost in the background. And remember – ALWAYS bring your camera with you when monitoring your trail – you never know what you will stumble across!
- Nestbox interior:
- First and foremost, do no harm.
- Some cavity nesters tolerate their box being checked or photographed; others may abandon or become very stressed. See differences between cavity nesters. In general, cavity nesters are less sensitive than open cup/ground nesters, and tend to be less likely to abandon a nest after eggs have hatched. Bluebirds are particularly tolerant of human activity.
- Avoid using a flash on nestlings, since we don’t know whether a flash could damage their developing eyes – especially the eyes of a bird that is supposed to be developing inside a dark cavity. Why take a chance?
- Do not open a box to photograph older nestlings, as you may frighten them into premature fledging.
- It is easiest to take photos in a nestbox with a removable roof. Photographing from the top also helps when nestlings are older and tend to hunker down in the nest. If the box has a front or side opening door, open the door very carefully so contents do not spill out. (See more information on monitoring).
- When photographing the interior of a nestbox, set your camera on the macro (close up) setting.
- Without a flash, you will have to hold the camera very still or set it on the fastest shutter speed. However, the colors will usually be more rich and natural.
- Some photographers carefully remove the nest to photograph it in natural light. If so, they’d better be quick and not drop anything! Be aware that the Migratory Bird Treaty Act prohibits this (and many other things monitors do.)
- Use a small magnifying mirror and tilt it slightly downward to get a shot of the contents of a nestcup without disturbing the nest. A 5″ handheld mirror (from a drug store – Goody makes one with one regular side and one magnifying side) will fit in almost any box. You can also use a mechanic’s mirror (from a hardware/auto parts store).
- A photo from both the top (showing the cup) and side view (e.g., what you see when you open a nestbox) are useful for ID purposes. Scale is also helpful – e.g. put a dime/ruler next to an egg or nest.
- Note that a quick photo can be useful later on (for counting nestlings, noting damage or changes, etc.)
- First and foremost, do no harm.
- Exterior shots: (some tips are from Photographing Birds, from Bluebirds and Their Survival by Wayne H. Davis and photographer Philippe Roca, and Susan and Richard Day)
- Plan your shot, especially the background (to avoid something distracting.)
- Background: Most great shots only have sky in the background. Choose something pleasant like an evergreen or flowering tree.
- Sunlight: Ideally, you want the sun behind you. Early morning and late afternoon light is less harsh than midday, and birds also tend to be more active during these times.
- Be patient. Be prepared to take lots of shots to get a few great ones. Let the birds get accustomed to your prescence. Move slowly. Try not to look directly at them (they don’t like this.)
- Blinds: If you want to get up close, use a blind – which can be a car, house, tent, playhouse, or through an open window (with a piece of fabric draped over you and your tripod), or a structure built specifically for photography or hunting. Keep in mind you may be in there for hours (bring a chair? snacks and drinks?), and will want to be able to take photos from different angles. Put it about 45 feet away from the spot you want to photograph.
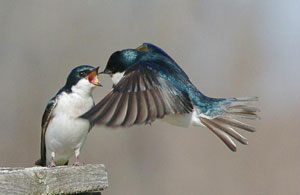
- For action shots (like flight), prefocus on the box or perch, and then shoot just when the bird enters the frame at 1/1000th or 1/2000 of a second.
- Focus on the bird’s eye.
- If you train bluebirds to come to a mealworm or suet feeder, you will improve your odds of a close up.
- Timing: early morning and late afternoon are best to avoid shadows or excessive light that washes out colors. Many birds are more active then anyway. Wendell Long likes to shoot on days with high clouds to reduce shadows.
- Plan your shot, especially the background (to avoid something distracting.)
- Equipment: There are so many different brands and variations of cameras available that I can’t begin to tell you which is “best.” I can tell you some of the great work I’ve seen was done using VERY EXPENSIVE equipment (e.g., a $4000 Canon Mark EOS, or a $10,000 telephoto lens.)
- You will probably want a lightweight, portable camera with bright reflex viewing, and fast shutter speeds. A shutter speed of 1/250 of a second or higher is needed for most shots, 1/1000 of a second is best for birds in flight.
- You will probably need a 300-600 mm lens, depending on how close you will be to the subject bird. A crummy zoom on a digital camera will produce disappointing shots. A zoom lens of 100-300 mm will let you switch from close-ups to wide-shots.
- Continuous auto focus will help with moving subjects.
- A motor will help you keep your eye on the viewfinder and get a lot of shots quickly.
- A tripod will help avoid camera shake. Set up a tripod with a fake camera for a day to two in advance so the birds get used to it.
- A cable release or remote control are handy. Wendell Long uses a cheap “air release” squeeze bulb that pushes air through a 60′ plastic tube to trip the shutter. An automatic advance on a 35 mm camera also helps so you don’t have to walk up and advance the film.
- If you use a 35 mm camera, Wendell likes Kodak 64 for true colors, or Kodak 100vs pro film.
- Sharing Your Photos:
- If you want to share your handiwork, you can use a free service like Flickr or Photobucket. You can also use a free blog that allows you to include text like WordPress or Blogger. Only post your very best work (to avoid boring people to death.)
- Some bluebird websites like The Bluebirding Forum and The Bluebird Nut Cafe allow and encourage posting.
- The North American Bluebird Society Bluebird journal and state bluebird conservation organizations are always looking for unique, high resolution photos of cavity nesters.
- I welcome submissions for my picture of the week and video of the month!
- If you use photos on a website or publication, respect copyright laws, and ALWAYS get the photographer’s permission.
- Remember to organize and catalog your photos so you can find the best ones in the future.
- And for heaven’s sake, make a backup of your hard drive so your digital photos are not lost forever if your computer crashes!
More Information:
- Websites with cavity nester photos – including spectacular shots by Wendell Long | David Kinneer | Leah
- Monitoring nestboxes
- Premature fledging
- Differences between cavity nesters
- Feeding bluebirds
- Picture of the week archives
- Video of the month archives
- Migratory Bird Treaty Act
- The Basics of Bird Photography, Birds of Oklahoma
- American Birding Association Code of Birding Ethics
take only photographs and leave nothing but time.
– Phillip Kirkham